一、什么事务

事务是数据库操作的基本单元,也就说逻辑上的一组操作,要么都成功,如果有一个失败操作则全都失败。

二、事务的四个特性(ACID)

  • 原子性

    要么都成功,要么都失败

  • 一致性

    操作之前和操作之后总量不变

  • 隔离性

    多事务操作时不过会相互产生影响

  • 持久性

    提交之后数据库中会发生改变

三、准备环节

1、创建数据库

1
2
3
4
5
6
7
8
9
10
11
12
13
14
15
16
17
18
19
20
21
SET NAMES utf8mb4;
SET FOREIGN_KEY_CHECKS = 0;

-- ----------------------------
-- Table structure for t_account
-- ----------------------------
DROP TABLE IF EXISTS `t_account`;
CREATE TABLE `t_account` (
`id` varchar(20) CHARACTER SET utf8mb4 COLLATE utf8mb4_general_ci NOT NULL,
`username` varchar(50) CHARACTER SET utf8mb4 COLLATE utf8mb4_general_ci NULL DEFAULT NULL,
`money` int(10) NULL DEFAULT NULL,
PRIMARY KEY (`id`) USING BTREE
) ENGINE = InnoDB CHARACTER SET = utf8mb4 COLLATE = utf8mb4_general_ci ROW_FORMAT = Dynamic;

-- ----------------------------
-- Records of t_account
-- ----------------------------
INSERT INTO `t_account` VALUES ('1', 'lusy', 1000);
INSERT INTO `t_account` VALUES ('2', 'mary', 1000);

SET FOREIGN_KEY_CHECKS = 1;

2、Service And Dao

创建Service,搭建Dao,完成对象创建和注入关系

service注入dao,在dao注入JdbcTemplate,在JdbcTemplate注入DataSource

  • service

    1
    2
    3
    4
    5
    6
    @Service
    public class UserService {
    //注入Dao
    @Autowired
    private UserDao userDao;
    }
  • dao

    1
    2
    public interface UserDao {
    }
    1
    2
    3
    4
    5
    @Repository
    public class UserDaoImpl implements UserDao {
    @Autowired
    private JdbcTemplate jdbcTemplate;
    }
  • bean.xml

    1
    2
    3
    4
    5
    6
    7
    8
    9
    10
    11
    12
    13
    14
    <!-- 组件扫描 -->
    <context:component-scan base-package="com.atguigu"></context:component-scan>
    <!-- 数据库连接池配置 -->
    <bean id="dataSource" class="com.alibaba.druid.pool.DruidDataSource" destroy-method="close">
    <property name="url" value="jdbc:mysql://ip:3306/user_db?useUnicode=true&amp;characterEncoding=UTF-8&amp;useSSL=false&amp;serverTimezone=Asia/Shanghai"></property>
    <property name="username" value="root"></property>
    <property name="password" value="root"></property>
    <property name="driverClassName" value="com.mysql.jdbc.Driver"></property>
    </bean>
    <!-- JdbcTemplate对象 -->
    <bean id="jdbcTemplate" class="org.springframework.jdbc.core.JdbcTemplate">
    <!-- 注入dataSource -->
    <property name="dataSource" ref="dataSource"></property>
    </bean>

3、创建方法

  • 在dao中创建两个方法

    1
    2
    3
    4
    5
    6
    7
    8
    9
    10
    11
    12
    13
    //多钱
    @Override
    public void add() {
    String sql = "update t_account set money = money + ? where username = ?";
    jdbcTemplate.update(sql, 100, "mary");
    }

    //少钱
    @Override
    public void reduce() {
    String sql = "update t_account set money = money - ? where username = ?";
    jdbcTemplate.update(sql, 100, "lucy");
    }
  • 在service添加如下方法模拟转账

    1
    2
    3
    4
    5
    6
    7
    //模拟转账的方法
    public void accountMoney() {
    //lucy少100
    userDao.reduce();
    //mary多100
    userDao.add();
    }
  • 添加测试方法

    1
    2
    3
    4
    5
    6
    @Test
    public void testAccount() {
    ApplicationContext context = new ClassPathXmlApplicationContext("bean1.xml");
    UserService userService = context.getBean("userService", UserService.class);
    userService.accountMoney();
    }

四、事务操作过程

1、开启事务

2、进行业务操作

3、没有异常发生就提交事务

4、出现异常就回退

一、关系数据结构及形式化定义

关系数据库系统是支持关系模型的数据库系统,本篇将介绍介绍关系模型。关系模型由 关系数据库 关系操作集合 关系完整性约束组成。

1、关系

关系模型只包含单一的数据结构: 关系,下面我们从集合论的角度给出关系数据结构的形式化定义。

a、域(domain)

定义2.1:是一组具有相同数据类型的值的集合。例如:自然数、整数、{0、1}、{男、女}

b、笛卡尔积(cartesian product)

定义2.2:给定一组域D1、D2、、、D3,则该域的笛卡尔积为:

D1 x D2 x ··· x Dn = {(d1, d2, ··· dn) | di ∈ Di, i = 1, 2, ··· n }

其中,每一个元素 (d1, d2, ··· dn)叫做一个 n元组(n-tuple),或简称 元组(tuple),元素中的每一个值 di叫做一个 分量(component)一个域允许的不同的取值个数称为这个域的基数(cardinal number)。

笛卡尔积可表示为一张二维表,表中的每一行对应一个元组,表中的每一列都来组一个域,如下给出三个域:

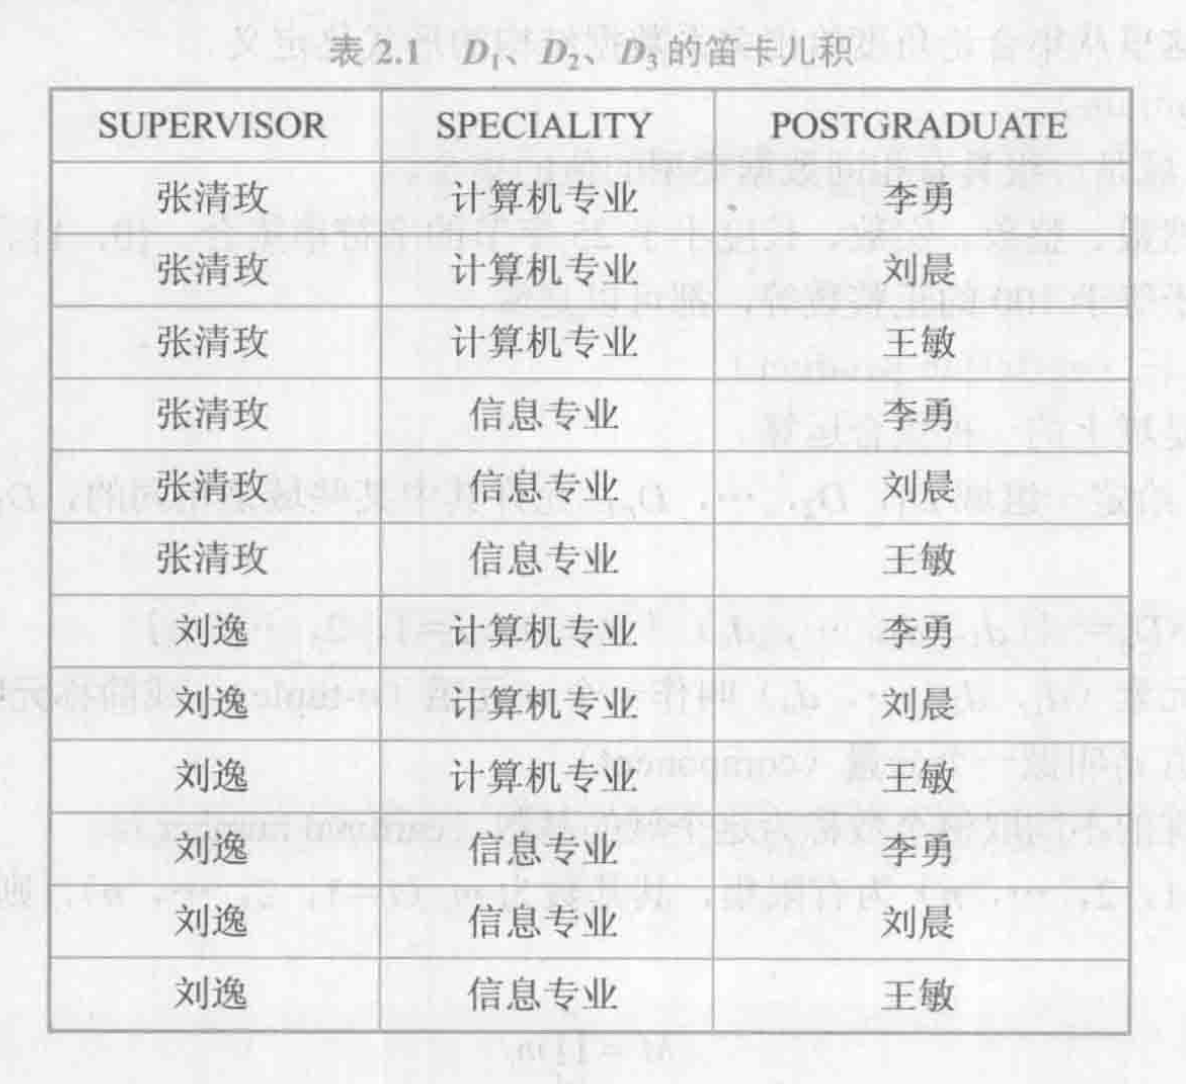
D1、D2、D3笛卡尔积为:

其中 (张清玫, 计算机专业, 李勇)是元组, 张清玫、计算机砖业都是分量。该笛卡尔积的基数为 2x2x3=12,也就是说共有12个元组,组成二维表如下:

c、关系(relation)

定义2.3: D1 x D2 x ··· x Dn的子集叫做在域 D1, D2, ··· Dn上的关系,表示为 R(D1, D2, ··· Dn) ,这里的R表示关系的名称,n是关系的目或度(degree)

若关系中的某一组属性能够唯一的标识一个元组,而其子集不能,则称该属性组为 候选码(candadate key),若一个关系有多个 候选码,则选定其中一个为主码(primary key)。

候选码的诸属性称为 主属性(prime attribute)。不包含在任何 候选码中的属性称为 非主属性(non-prime attribute)或者 非码属性(non-key attribute)

在最简单的情况下, 候选码只有一个属性,在最极端的情况下,关系模式中的所有属性是这个关系模式的候选码,称为 全码(all-key)。关系可以有三种类型: 基本关系(通常又称为基本表或基表) 查询表 视图表。基本关系具有以下六种性质:

关系的每一个分量为一个不可分的数据项,如下表不符合规范化的要求(表中有表):

2、关系模式

关系的描述称为 关系模式(relation schema),它可以形式化的表示为: R(U, D, DOM, F),其中R为关系名,U为组成该关系的属性名集合,D为U所来自的域,DOM为属性向域的映像集合,F为属性间数据的依赖关系集合。

关系是 关系模式在某一时刻的状态或内容,关系模式是静态的稳定的,而关系动态的随时间不断变化的。

3、关系数据库

关系数据库也有值和型之分:

  • 关系数据库的型也称为 关系数据库模式,是对关系数据库的描述
  • 关系数据库的值是这些关系模式在某一时刻对应的关系集合,通常就称为 关系数据库

4、关系模型的存储结构

在关系数据库的物理组织中,有的关系数据库管理系统中的一个表对应一个操作系统文件,将物理数据组织交给操作系统;有的从操作系统申请若干个大的文件,自己划分空间,组织表、索引等存储结构,进行存储管理。

二、关系操作

关系模型给出了关系操作能力的说明,但没有对关系数据库管理语言做具体的语法要求。

1、基本的关系操作

关系模型中常用的操作为:查询(Query)插入(Insert) 删除(Delete)修改(Update)

查询操作又分为:选择(select) 投影(project)连接(join)除(divide)并(union)差(except)交(intersection)笛卡尔积

关系操作的对象和结果都是集合

2、关系数据语言的分类

三、关系的完整性

关系模型的完整性规则是对关系的某种约束条件

关系模型中有三类完整性约束:实体完整性(entity integrity)参照完整性(referential integrity)用户定义的完整性(user-defined integrity),其中前两个是关系模型必须满足的完整性约束条件,被称为关系的两个不变性

1、实体完整性

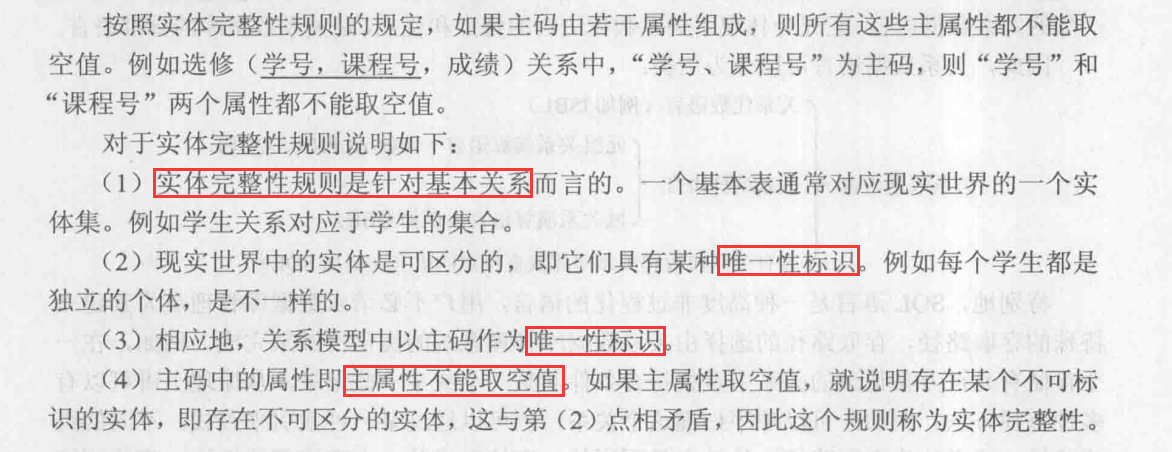
规则2.1 实体完整性规则:若属性(指一个或一组属性)A是基本关系R的主属性,则A不能取空值(null value)

说白了就是主属性不能为空

2、参照完整性

3、用户定义的完整性

四、关系代数

1、传统的集合运算

2、专门的运算关系

a、选择(selection)
b、投影(projection)
c、连接(join)
d、除运算(division)

一、什么是JdbcTemplate

所谓 JdbcTemplate,就是Spring框架对JDBC进行封装,使用 JdbcTemplate方便实现对数据库的操作

二、准备工作

1、引入相关Jar包

链接: https://pan.baidu.com/s/1hWsFROhJlzulOZpnuUgRHw 密码: 2q9k

2、数据库连接池配置

src目录下新建 bean1.xml文件,在里面加上以下配置信息:

1
2
3
4
5
6
7
<!-- 数据库连接池配置 -->
<bean id="dataSource" class="com.alibaba.druid.pool.DruidDataSource" destroy-method="close">
<property name="url" value="jdbc:mysql:///user_db"></property>
<property name="username" value="root"></property>
<property name="password" value="root"></property>
<property name="driverClassName" value="com.mysql.jdbc.Driver"></property>
</bean>

3、JdbcTemplate

配置JdbcTemplate对象,注入DataSource

1
2
3
4
5
<!-- JdbcTemplate对象 -->
<bean id="jdbcTemplate" class="org.springframework.jdbc.core.JdbcTemplate">
<!-- 注入dataSource -->
<property name="dataSource" ref="dataSource"></property>
</bean>

4、创建Service And Dao

创建service类,创建dao类,在dao中注入jdbcTemplate对象。

a、配置组件扫描
1
2
<!-- 组件扫描 -->
<context:component-scan base-package="com.atguigu"></context:component-scan>
b、创建BookService
1
2
3
4
5
6
@Service
public class BookService {
//注入BookDao
@Autowired
private BookDao bookDao;
}
c、注入JdbcTemplate
1
2
3
4
5
6
@Repository
public class BookDaoImpl implements BookDao {
//注入JdbcTemplate
@Autowired
private JdbcTemplate jdbcTemplate;
}
d、创建数据库表
1
2
3
4
5
6
7
8
9
10
11
12
13
```


#### 5、创建Entity实体类

```java
public class Book {
private Integer userId;
private String username;
private String ustatus;
//getter and setter 方法
}

6、Dao

在Dao进行数据库添加操作,调用JdbcTemplate对象里的update方法实现添加操作:

int update(String var1, @Nullable Object... var2) throws DataAccessException;

参数说明:

  • 第一个参数:需要执行的sql语句
  • 第二个参数:可变参数,设置sql语句值

代码如下:

1
2
3
4
5
6
7
8
9
10
//添加的方法
@Override
public void add(Book book) {
//创建SQL语句
String sql = "insert into t_book values(?, ?, ?)";
//调用方法实现
Object[] args = {book.getUserId(), book.getUsername(), book.getUstatus()};
int update = jdbcTemplate.update(sql, args);
System.out.println(update);
}

7、测试一下

1
2
3
4
5
6
7
8
9
10
11
12
13
public class TestBook {
@Test
public void testAdd() {
ApplicationContext context =
new ClassPathXmlApplicationContext("bean1.xml");
BookService bookService = context.getBean("bookService", BookService.class);
Book book = new Book();
book.setUserId(1);
book.setUsername("Java");
book.setUstatus("sale");
bookService.addBook(book);
}
}

删除与修改与之类似

一、Vocabulary

1、exuberance

n.丰富,充沛

2、soaking

adj.湿透的,湿淋淋的

4、crucial

adj.至关重要的,关键性的

5、potentially

adv.潜在地

6、inspire

v.激励,鼓舞,启发

7、prime

adj.首要的,头等的;n.最初,青年

8、inconsequential

adj.微不足道的,细琐的

9、bouquet

n.花束,(尤指酒的)香味

10、conductor

n.指挥;售票员;列车员;导体

11、flux

n.不断变化的

12、fluff

adj.蓬松毛团;v.搞糟,弄砸

13、workforce

n.劳动大军

14、applicable

adj.适用的,合适的

15、insufficient

adj.不充分的,不够的

16、hone

v.磨炼;n.磨刀石

二、Phrase

1、fire up

生火,点燃

2、regardless of

不顾,不惜

三、SpecificNoun

1、society’s norm

社会准则

2、secondary school

中学

3、Commanding Officer

辅导员

四、Sentence

In our early twenties, we’re all restless and in flux. If we can get more out of what college can truly offer, then our precious years and hefty(adj.大而重的;n.体壮力大的人) tuition(学费;讲授;教学) could form the bedrock for the rest of our lives-an investment that multiplies.

在我们20岁出头时,我们都躁动不安,不断变化。如果我们能从大学真正能提供的东西里得到更多,那么我们宝贵的时光和高昂的学费将会成为我们余生的基石-一种成倍的投资。

Take it as a challenge to hone you, not a blow to bring you down.

千磨万击还坚韧,任尔东西南北风。

一、网络编程基础知识

1、网络基础知识

2、IP地址和端口号

二、Java的基本网络支持

1、使用InternetAddress

2、使用URLDecoder和URLEncoder

3、URL、URLConnection和URLPermission

三、基于TCP协议的网络编程

1、TCP协议基础

2、使用ServerSocket创建TCP服务器端

3、使用Socket进行通信

4、加入多线程

5、记录用户信息

6、半关闭的Socket

7、使用NIO实现非阻塞的Socket通信

8、使用AIO实现非阻塞通信

四、基于UDP协议的网络编程

1、UDP协议基础

2、使用DatagramSocket实现发送、接收数据

3、使用MulticastSocket实现多点广播

五、使用代理服务器

1、直接使用Proxy创建连接

2、使用ProxySelector自动选择代理服务器

六、Java11标准化的Http Client

1、发送同步的Get请求

2、发送带请求体的请求

3、发送异步请求

4、WebSocket客户端支持

5、基于WebSocket的多人实时聊天

七、本章小结

一、Vocabulary

1、shamrock

n.三叶草

2、tattoo

n.纹身

3、babysit

n.保姆

4、escort

n.护卫,护航舰;v.护送

二、Phrase

1、mow lawn

修剪草坪

三、SpecificNoun

1、

一、包装类

二、处理对象

1、打印对象和 toString()方法

2、 == equals方法

三、类成员

1、理解类成员

2、单例(Singleton)类

四、final修饰符

1、final成员变量

2、final局部变量

3、final修饰基本类型变量和引用类型变量的区别

4、可执行“宏替换”的final变量

5、final方法

6、final类

7、不可变类

8、缓存实例的不可变类

五、抽象类

1、抽象方法和抽象类

2、抽象类的作用

六、Java9改进的接口

1、接口的概念

2、Java9中接口的定义

3、接口的继承

4、使用接口

5、接口和抽象类

6、面向接口编程

七、内部类

所谓内部类,就是将一个类放在另一个类内部定义,这个定义在其他类内部的类就叫做内部类(嵌套类),包含内部类的类也称为外部类(宿主类)。Java从JDK1.1开始引入内部类,主要有如下作用:

  • 内部类提供了更好的封装,可以将内部类隐藏到外部类之内,不允许同包下的其他类访问该类。

    例如:Cow类里面创建一个CowLeg类

  • 内部类成员可以直接访问外部类的私有数据

  • 匿名内部类适合于创建那些仅需要一次使用的类

此外,使用内部类时还需注意以下两点:

  • 内部类比外部类可以多使用三个修饰符:privateprotectedstatic(外部类不可使用)
  • 非静态内部类不可拥有静态成员

1、非静态内部类

大多数时候,内部类都被作为成员内部类定义,而不是作为局部内部类。成员内部类是一种与成员变量、方法、构造器和初始化块相似的类成员,局部内部类和匿名内部类不是类成员。

成员内部类分为两种: 静态内部类 非静态内部类,使用static修饰的为静态内部类。

经常看到同一个Java源文件里定义了多个类,那不是内部类,他们依然是两个相互独立的类,如下:

1
2
3
//下面两个类相互独立,没有谁是谁的内部类
class A {}
public class B {}

外部类的上一级程序单元是包,所以只有两个作用域: 同一个包内 任何位置,因此只需要两种访问权限: 包访问权限 公开访问权限,正好对应于 省略访问控制符 public访问控制符

内部类的上一级程序单元是外部类,具有四个作用域: 同一个类 同一个包 父子类 任何位置,因此可以使用4种访问控制权限

下面的程序在Cow类里面定义了一个CowLeg非静态内部类,并在方法中直接访问Cow的private的实例变量:

1
2
3
4
5
6
7
8
9
10
11
12
13
14
15
16
17
18
19
20
21
22
23
24
25
26
27
28
29
30
31
public class Cow {
private double weight;
//外部类的构造器
public Cow(double weight) { this.weight = weight; }
//定义一个非静态内部类
private class CowLeg {
//非静态内部类的两个实例变量
private double length;
private String color;
//内部类的构造器
public CowLeg(double length, String color) {
this.length = length;
this.color = color;
}
//非静态内部类的实例方法
public void info() {
System.out.println("牛腿颜色为:" + color);
System.out.println("牛高:" + length);
//直接访问外部类private修饰的成员变量
System.out.println("奶牛重:" + weight);
}
}
public void test() {
var cl = new CowLeg(1.12, "黑白相间");
cl.info();
}
public static void main(String[] args) {
var cow = new Cow(378.9);
cow.test();
}
}

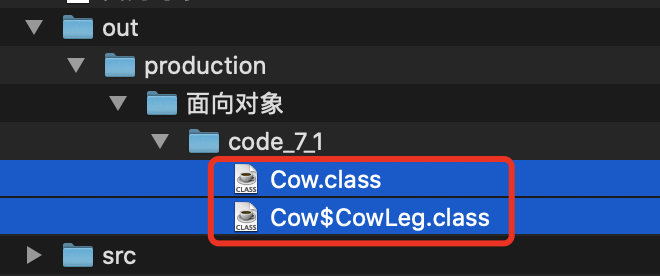
编译上面程序,发现文件所在路径下生成了两个class文件,如下图:

成员内部类(包括静态内部类、非静态内部类)的class文件总是以这种形式:OuterClass$InnerClass.class

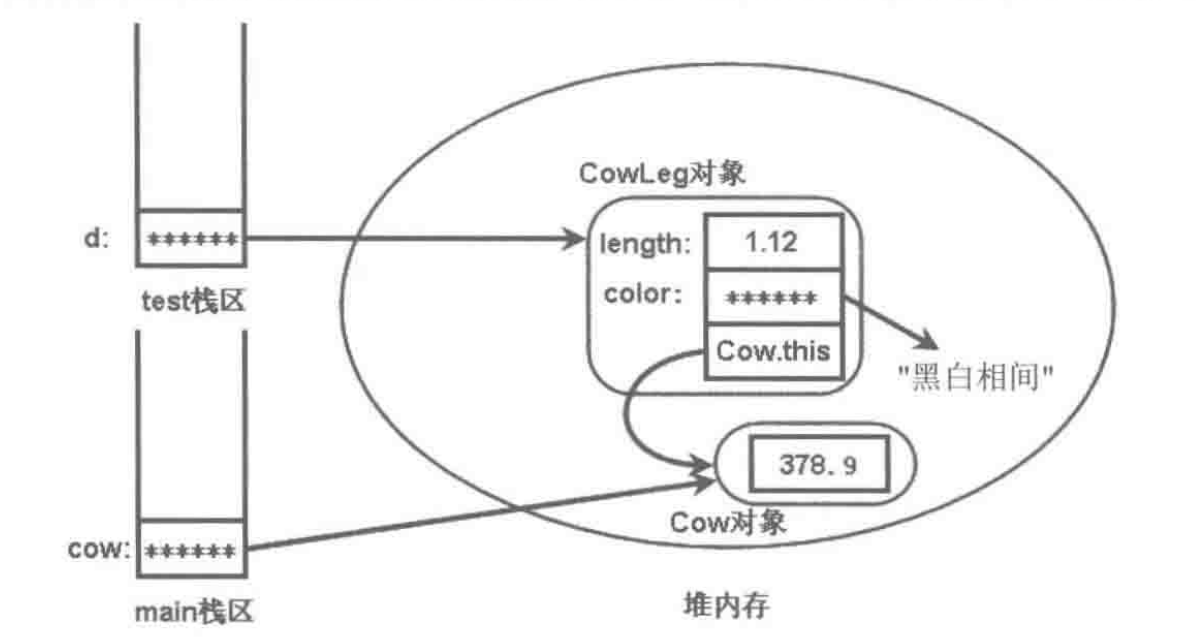
内部类之所以可以访问外部类的private成员,是因为在非静态内部类对象中,保存了一个它所寄生的外部类对象的引用(当调用非静态内部类实例方法时,必须有一个非静态内部类实例,非静态内部类必须寄生在外部类实例里面),如下图所示:

2、静态内部类

3、使用内部类

4、局部内部类

5、匿名内部类

八、Java11增强的Lambda表达式

1、Lambda表达式入门

2、Lambda表达式与函数式接口

3、在Lambda表达式中使用var

4、方法引用与构造器引用

5、Lambda表达式与匿名内部类的联系和区别

6、使用Lambda表达式调用Arrays的类方法

九、枚举类

1、手动实现枚举类

2、枚举类入门

3、枚举类成员变量、方法与构造器

4、实现接口的枚举类

5、包含抽象方法的枚举类

十、对象与垃圾回收

1、对象在内存中的状态

2、强制垃圾回收

3、finalize方法

4、对象的软、弱和虚引用

十一、修饰符的适用范围

十二、多版本JAR包

1、jar命令详解

2、创建可执行的JAR包

3、关于JAR包的技巧

十三、本章小结

https://cos-1301609895.cos.ap-nanjing.myqcloud.com/aop4.png

一、AOP底层使用动态代理

1、两种动态代理

a、有接口

需使用JDK的动态代理,创建接口实现类的代理对象,增强类的方法,如下图:

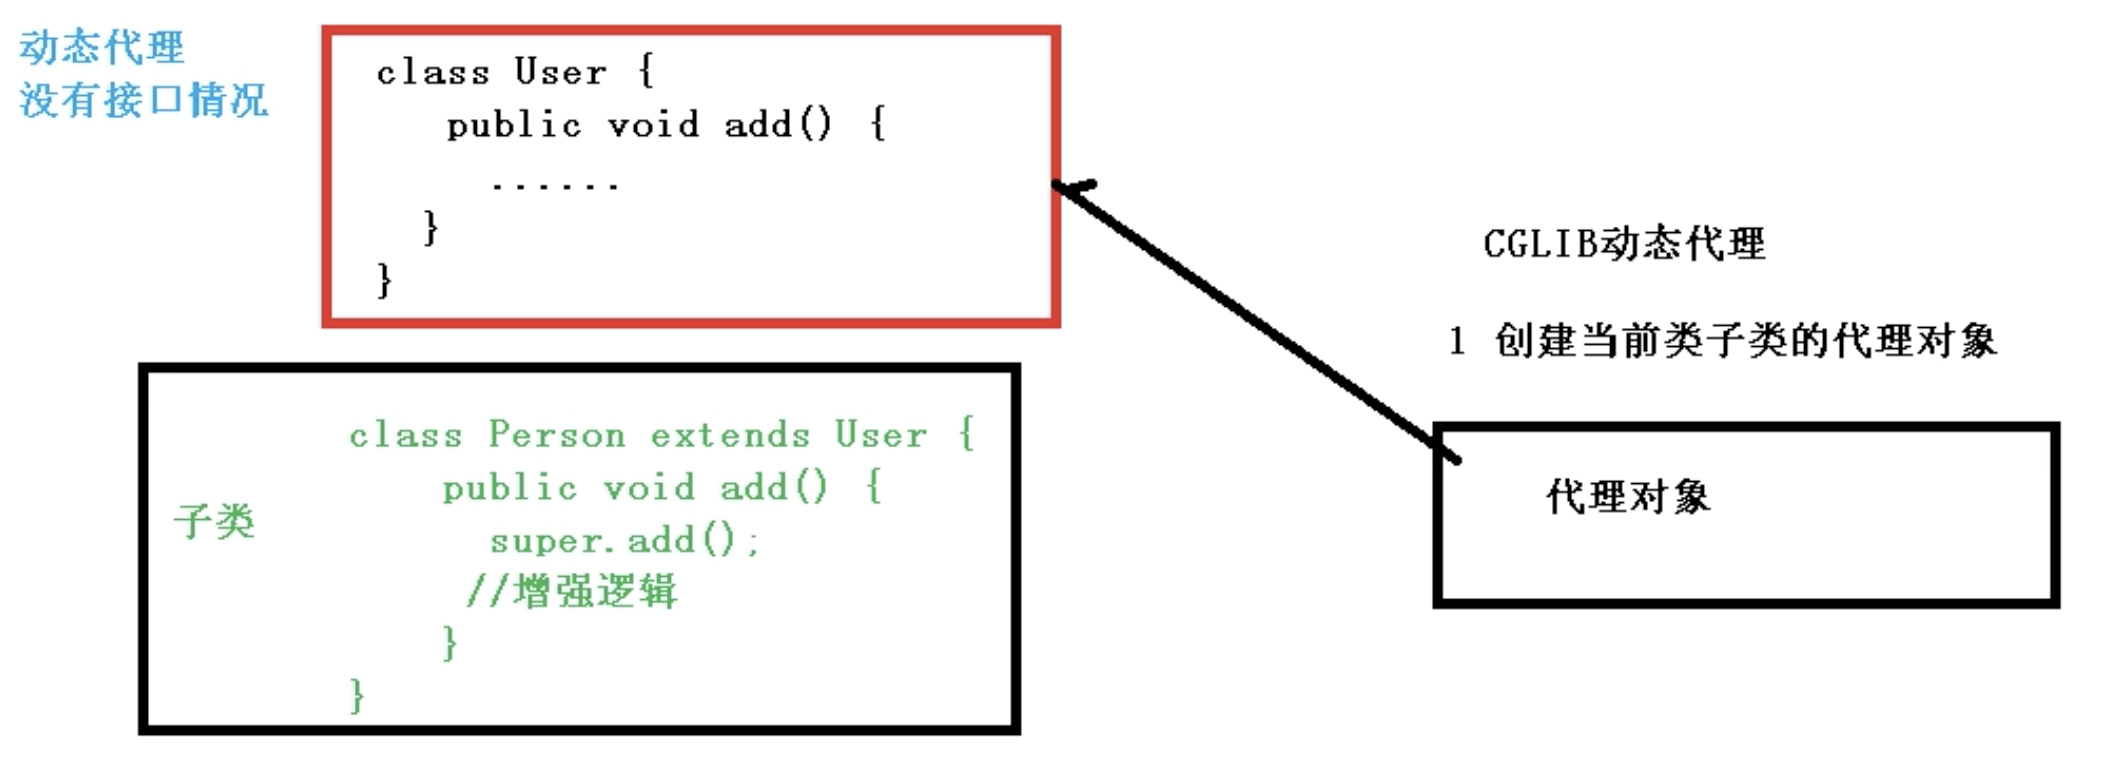
b、没有接口

使用CGLIB动态代理,继承父类重写父类方法,实现代理,如下图:

二、AOP(JDK动态代理)

1、使用JDK动态代理,使用Proxy类里的方法创建代理对象

Class Proxy

使用下面这个方法创建代理类的实例:

newProxyInstance方法三个参数的含义:

  • ClassLoader loader:类加载器
  • 类<?>[] interfaces:增强方法所在的类,这个类所实现的接口
  • InvocationHandler h:实现这个接口InvocationHandler,创建代理对象,写增强的方法

2、使用JDK动态代理来写代码

a、创建接口,定义方法
1
2
3
4
public interface UserDao {
public int add(int a, int b);
public String update(String id);
}
b、创建接口实现类,实现方法
1
2
3
4
5
6
7
8
9
10
public class UserDaoImpl implements UserDao {
@Override
public int add(int a, int b) {
return a + b;
}
@Override
public String update(String id) {
return id;
}
}
c、使用Proxy类创建接口代理对象

匿名内部类方式:

1
2
3
4
5
6
7
8
9
10
11
12
public class JDKProxy {
public static void main(String[] args) {
//创建接口实现类代理对象
Class[] interfaces = {UserDao.class};
Proxy.newProxyInstance(JDKProxy.class.getClassLoader(), interfaces, new InvocationHandler() {
@Override
public Object invoke(Object proxy, Method method, Object[] args) throws Throwable {
return null;
}
});
}
}

实现接口的方式:

1
2
3
4
5
6
7
8
9
10
11
12
13
14
15
16
17
18
19
20
21
22
23
24
25
26
27
28
29
30
31
32
public class JDKProxy {
public static void main(String[] args) {
//创建接口实现类代理对象
Class[] interfaces = {UserDao.class};
UserDao userDao = new UserDaoImpl();
UserDao dao = (UserDao) Proxy.newProxyInstance(JDKProxy.class.getClassLoader(), interfaces, new UserDaoProxy(userDao));
int result = dao.add(1, 2);
System.out.println(result);
}
}

//创建代理对象代码
class UserDaoProxy implements InvocationHandler {
private Object object;
//创建的是谁的代理对象,就将谁传进来
//有参构造传递参数
public UserDaoProxy(Object obj) {
this.object = obj;
}

//写我们要增强的操作逻辑
@Override
public Object invoke(Object proxy, Method method, Object[] args) throws Throwable {
//方法之前
System.out.println("方法之前执行......" + method.getName() + ":传递的参数是" + Arrays.toString(args));
//被增强的方法
Object res = method.invoke(object, args);
//方法之后
System.out.println("方法之前执行......" + object);
return res;
}
}

三、AOP(术语)

1、连接点

类里面哪些方法可以被增强,这些方法称为连接点

2、切入点

实际真正被增强的方法,这些方法称为切入点

3、通知(增强)

实际增强的逻辑部分,即增加的代码逻辑部分,通知有以下几种:

  • 前置通知
  • 后置通知
  • 环绕通知
  • 异常通知
  • 最终通知

4、切面

指的是一个动作,指把通知应用到切入点的过程

四、AOP操作(准备)

Spring框架一般都是基于AspectJ实现AOP操作的

1、什么是AspectJ

AspectJ不是Spring的组成部分,它是一个独立的AOP框架,一般将Spring和AspectJ一起使用,从而进行AOP操作

2、基于AspectJ实现AOP操作

a、基于xml配置文件方式实现
b、基于注解方式实现(使用)

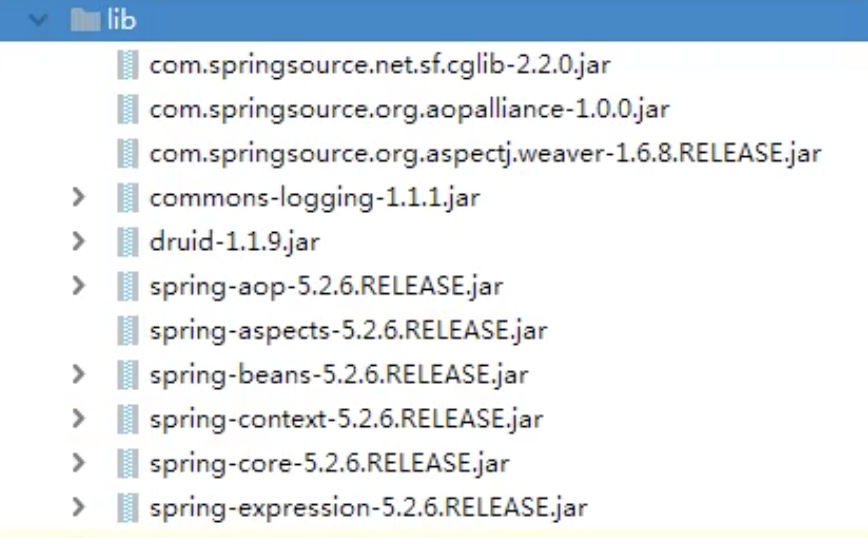
3、在项目工程中引入相关AOP依赖

需要引入以下相关依赖:

4、切入点表达式

a、切入点表达式的作用

知道对哪个类里面的那个方法进行增强

b、语法结构

execution( [权限修饰符] [返回类型] [类全路径] [方法名称] ( [参数列表] ) )

  • 对一个类里的某一个方法进行增强

    1
      
  • 对一个类里的所有的方法进行增强

    1
      
  • 对包里的所有类,类里面的所有方法进行增强

    1
    2
    3
    4
    5
    6
    7
    8
    9
    10
    11
    12
    13
    14
      ```


    ### 五、AOP操作(AspectJ注解)

    #### 1、创建类,在类中定义方法

    ```java
    public class User {
    public void add() {
    System.out.println("add()......");
    }
    }

2、创建增强类(编写增强逻辑)

在增强类里面创建方法,让不同的方法代表不同的通知

1
2
3
4
5
6
7
//增强的类
public class UserProxy {
//前置通知
public void before() {
System.out.println("before()......");
}
}

3、进行通知的配置

a、在Spring配置文件中,开启注解扫描
1
2
3
4
5
6
7
8
9
10
11
12
<?xml version="1.0" encoding="UTF-8"?>
<beans xmlns="http://www.springframework.org/schema/beans"
xmlns:xsi="http://www.w3.org/2001/XMLSchema-instance"
xmlns:context="http://www.springframework.org/schema/context"
xmlns:aop="http://www.springframework.org/schema/aop"
xsi:schemaLocation="http://www.springframework.org/schema/beans
http://www.springframework.org/schema/beans/spring-beans.xsd
http://www.springframework.org/schema/context http://www.springframework.org/schema/context/spring-context-3.0.xsd
http://www.springframework.org/schema/aop http://www.springframework.org/schema/aop/spring-aop-3.0.xsd">
<!-- 开启注解扫描 -->
<context:component-scan base-package="com.atguigu.spring5.aopanno"></context:component-scan>
</beans>
b、使用注解创建User和UserProxy对象

User UserProxy加上 @Component

c、在增强的类上面添加注解@Aspect

@Aspect代表生成的对象

d、在Spring配置文件中开启生成代理对象
1
2
<!-- 开启Aspect生成代理对象 -->
<aop:aspectj-autoproxy></aop:aspectj-autoproxy>

4、配置不同类型的通知

在增强类里面,在作为通知方法最上面添加通知类型注解,使用切入点表达式配置

如下在 UserProxy类中加上 @Before注解:

1
2
//@Before表示作为前置通知(切入点表达式指明哪个类中的哪个方法)
@Before(value = "execution(* com.atguigu.spring5.aopanno.User.add())")

接下来我们看看所有的通知类型:

1
2
3
4
5
6
7
8
9
10
11
12
13
14
15
16
17
18
19
20
21
22
23
24
25
26
27
28
29
30
31
32
33
34
//增强的类
@Component
@Aspect
public class UserProxy {
//前置通知
//@Before表示作为前置通知(切入点表达式指明哪个类中的哪个方法)
@Before(value = "execution(* com.atguigu.spring5.aopanno.User.add())")
public void before() {
System.out.println("before()......");
}
//后置通知
@After(value = "execution(* com.atguigu.spring5.aopanno.User.add())")
public void after() {
System.out.println("after()......");
}
//最终通知
@AfterReturning(value = "execution(* com.atguigu.spring5.aopanno.User.add())")
public void afterReturning() {
System.out.println("afterReturning()......");
}
//异常通知
@AfterThrowing(value = "execution(* com.atguigu.spring5.aopanno.User.add())")
public void afterThrowing() {
System.out.println("afterThrowing()......");
}
//环绕通知
@Around(value = "execution(* com.atguigu.spring5.aopanno.User.add())")
public void around(ProceedingJoinPoint proceedingJoinPoint) throws Throwable {
System.out.println("环绕之前......");
//被增强的方法
proceedingJoinPoint.proceed();
System.out.println("环绕之后......");
}
}

注意点:

  • @After @AfterReturning的区别

    前者在方法之后执行,后者在方法返回结果之后执行

  • @AfterThrowing是异常通知,只有在发生异常之后才会执行

5、相同切入点的抽取

如上述代码的 "execution(* com.atguigu.spring5.aopanno.User.add())"部分,具体如何做请看代码:

1
2
3
4
5
6
7
8
9
10
//相同切入点抽取
@Pointcut(value = "execution(* com.atguigu.spring5.aopanno.User.add())")
public void pointdemo() { }

//前置通知
//@Before表示作为前置通知(切入点表达式指明哪个类中的哪个方法)
@Before(value = "pointdemo()")
public void before() {
System.out.println("before()......");
}

6、增强类的优先级

当有多个增强类对同一个方法进行增强时,我们可以设置增强类的优先级。在增强类上面添加注解 @Order(数字类型值),数字类型值越小代表优先级越高,如下 PersonProxy的优先级为1:

1
2
3
4
5
6
@Component
@Aspect
@Order(1)
public class PersonProxy {
······
}

7、完全注解开发

创建配置类,不再需要配置文件,只需创建如下配置类:

1
2
3
4
5
@Configuration
@ComponentScan(basePackages = {"com.atguigu"})
@EnableAspectJAutoProxy(proxyTargetClass = true)
public class ConfigAop {
}

六、AOP操作(AspectJ配置文件)

未完待续……

一、基于 chip_test.csv数据集,建立逻辑回归模型(二阶边界),评估模型表现

1、加载数据

1
2
3
4
5
# load the data
import pandas as pd
import numpy as np
data = pd.read_csv('chip_test.csv')
data.head()

2、为数据添加标签

合格即为 true,否则为 false

1
2
3
# add label mask
mask = data.loc[:, 'pass'] == 1
print(~mask)

3、数据的可视化

plt.scatter()原型如下:

1
matplotlib.pyplot.scatter(x, y, s=None, c=None, marker=None, cmap=None, norm=None, vmin=None, vmax=None, alpha=None, linewidths=None, verts=None, edgecolors=None, *, data=None, **kwargs)
  • x、y:表示的是大小为(n, )的数组,也就是我们即将绘制散点图的数据点
  • s:一个实数或者是一个数组大小为(n, ),点的所占的面积大小
  • c:颜色
  • marker:表示的是标记的样式,默认的是 'o'
  • cmap:Colormap实体或者是一个colormap的名字,cmap仅仅当c是一个浮点数数组的时候才使用(默认image.cmap)
  • norm:Normalize实体来将数据亮度转化到0-1之间,也是只有c是一个浮点数的数组的时候才使用(默认colors.Normalize)
  • vmin、vmax:实数,当norm存在的时候忽略(用来进行亮度数据的归一化)
  • alpha:实数,调整线不透明度(0-1)
  • linewidths:也就是标记点的长度
1
2
3
4
5
6
7
8
9
10
11
# visualize the data
%matplotlib inline
from matplotlib import pyplot as plt
fig1 = plt.figure()
passed = plt.scatter(data.loc[:, 'test1'][mask], data.loc[:, 'test2'][mask])
failed = plt.scatter(data.loc[:, 'test1'][~mask], data.loc[:, 'test2'][~mask])
plt.title('test1-test2')
plt.xlabel('test1')
plt.xlabel('test2')
plt.legend((passed, failed), ('passed', 'failed'))
plt.show()

4、定义X、y变量

1
2
3
4
5
6
# define X y
# axis=1代表删掉‘pass’这一列
X = data.drop(['pass'], axis=1)
y = data.loc[:, 'pass']
X1 = data.loc[:, 'test1']
X2 = data.loc[:, 'test2']

5、定义X1方、X2方等变量

DataFrame是Python中Pandas库中的一种数据结构,它类似excel,是一种二维表。DataFrame的单元格可以存放数值、字符串等,这和excel表很像,同时DataFrame可以设置列名columns与行名index,如下通过 X_new设置了五列:

1
2
3
4
5
6
7
# create new data
X1_2 = X1*X1
X2_2 = X2*X2
X1_X2 = X1*X2
X_new = {'X1':X1, 'X2':X2, 'X1_2':X1_2, 'X2_2':X2_2, 'X1_X2':X1_X2}
X_new = pd.DataFrame(X_new)
print(X_new)

6、建立实例并训练模型

1
2
3
4
# establish new model and train
from sklearn.linear_model import LogisticRegression
LR2 = LogisticRegression()
LR2.fit(X_new, y)

7、预测数据

1
2
3
4
5
# predict
from sklearn.metrics import accuracy_score
y2_predict = LR2.predict(X_new)
accuracy2 = accuracy_score(y, y2_predict)
print(accuracy2)

8、获取曲线参数

1
2
3
4
5
# get the params
X1_new = X1.sort_values()
theta0 = LR2.intercept_
theta1, theta2, theta3, theta4, theta5 = LR2.coef_[0][0], LR2.coef_[0][1], LR2.coef_[0][2], LR2.coef_[0][3], LR2.coef_[0][4]
print(theta0, theta1, theta2, theta3, theta4, theta5)

9、构建边界曲线

1
2
3
4
5
# Constructing boundary curve
a =theta4
b = theta5*x1_new + theta2
c = theta0 + theta1*x1_new + theta3*x1_new*x1_new
X_new_boundary = (-b + np.sqrt(b*b - 4*a*c))/(2*a)

10、画曲线

1
2
3
4
5
6
7
8
9
10
# draw the pic
fig4 = plt.figure()
plt.plot(X1_new, X_new_boundary)
passed = plt.scatter(data.loc[:, "test1"][~mask], data.loc[:, "test2"][~mask])
failed = plt.scatter(data.loc[:, "test1"][mask], data.loc[:, "test2"][mask])
plt.title("test1-test2")
plt.xlabel("test1")
plt.ylabel("test2")
plt.legend((passed, failed), ('passed', 'failed'))
plt.show()

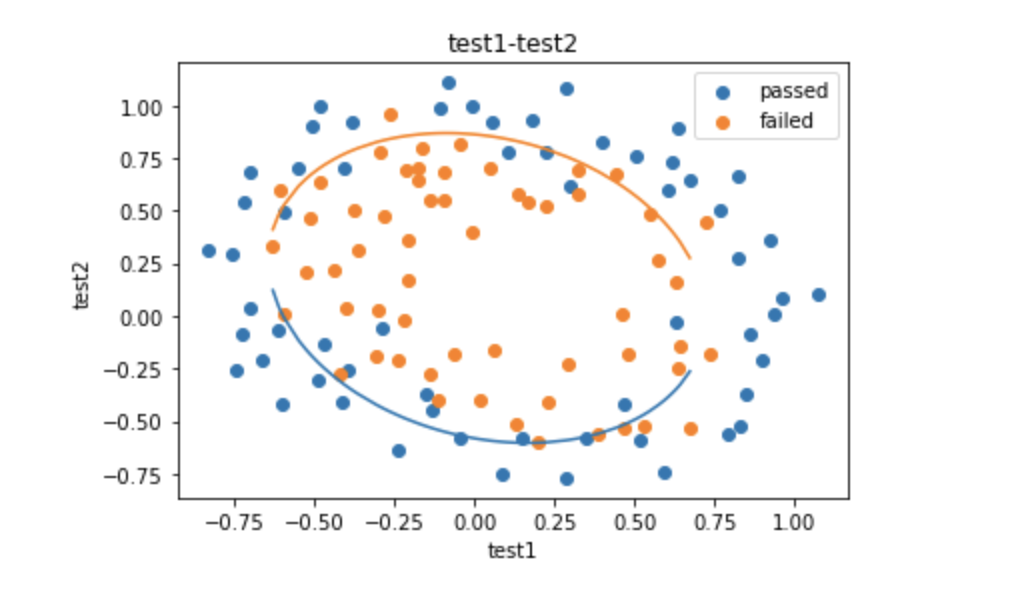
画出来的图像如下(图像并不完整):

我们只需加上如下代码:

1
2
X_new_boundary_2 = (-b - np.sqrt(b*b - 4*a*c))/(2*a)
plt.plot(X1_new, X_new_boundary_2)

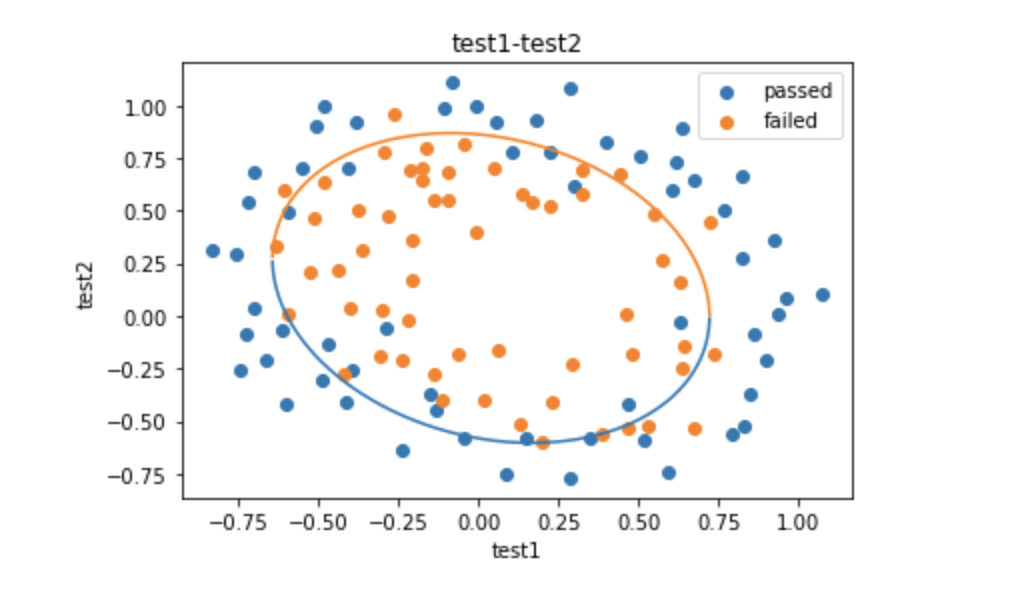
于是画出来的图像便变成如下所示:

二、以函数的方式求解边界曲线

1、定义函数f(x)

1
2
3
4
5
6
7
8
# define f(x)
def f(X1_new):
a =theta4
b = theta5*X1_new + theta2
c = theta0 + theta1*X1_new + theta3*X1_new*X1_new
X_new_boundary1 = (-b + np.sqrt(b*b - 4*a*c))/(2*a)
X_new_boundary2 = (-b - np.sqrt(b*b - 4*a*c))/(2*a)
return X_new_boundary1, X_new_boundary2

2、获取新边界

1
2
3
4
5
6
7
# get X_new_boundary
X2_new_boundary1 = []
X2_new_boundary2 = []
for x in X1_new:
X2_new_boundary1.append(f(x)[0])
X2_new_boundary2.append(f(x)[1])
print(X2_new_boundary1, X2_new_boundary2)

3、画图

1
2
3
4
5
6
7
8
9
10
fig5 = plt.figure()
plt.plot(X1_new, X2_new_boundary1)
plt.plot(X1_new, X2_new_boundary2)
passed = plt.scatter(data.loc[:, "test1"][~mask], data.loc[:, "test2"][~mask])
failed = plt.scatter(data.loc[:, "test1"][mask], data.loc[:, "test2"][mask])
plt.title("test1-test2")
plt.xlabel("test1")
plt.ylabel("test2")
plt.legend((passed, failed), ('passed', 'failed'))
plt.show()

图像如下(我们发现两边缺了一点):

4、补数据

x轴数据补多一点

1
2
3
4
5
6
7
X1_range = [-0.9 + x/10000 for x in range(0, 19000)]
X1_range = np.array(X1_range)
X2_new_boundary1 = []
X2_new_boundary2 = []
for x in X1_range:
X2_new_boundary1.append(f(x)[0])
X2_new_boundary2.append(f(x)[1])

5、描绘出完整的决策边界曲线

1
2
3
4
5
6
7
8
9
10
fig6 = plt.figure()
passed = plt.scatter(data.loc[:, "test1"][~mask], data.loc[:, "test2"][~mask])
failed = plt.scatter(data.loc[:, "test1"][mask], data.loc[:, "test2"][mask])
plt.plot(X1_range, X2_new_boundary1)
plt.plot(X1_range, X2_new_boundary2)
plt.title("test1-test2")
plt.xlabel("test1")
plt.ylabel("test2")
plt.legend((passed, failed), ('passed', 'failed'))
plt.show()

图如下: